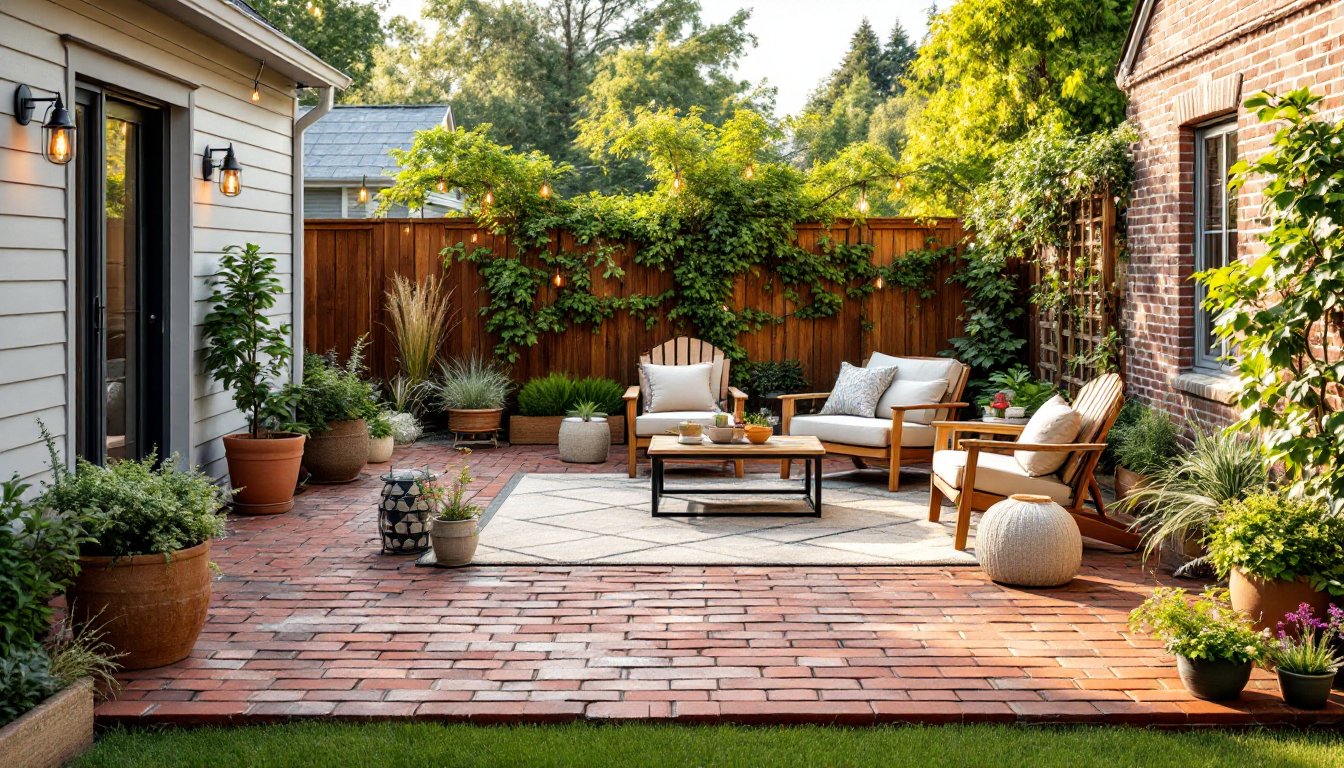
A pergola is perfect for catching shade and fresh air, but sometimes you need more than open beams to feel truly secluded. Whether you’re looking to block an intrusive neighbor’s view, create a quiet corner for reading, or simply add visual interest to your outdoor space, a privacy wall can turn your pergola into a genuine retreat. The good news? You don’t need to tear down and rebuild, you can add privacy screening using materials ranging from living plants to metal panels, and most projects fit a weekend schedule. This guide walks through seven proven approaches, from natural green screens to modern metal lattice, so you can pick what matches your style, budget, and patience level.
Table of Contents
ToggleKey Takeaways
- Pergola privacy wall ideas range from living vines and slatted wood to metal lattice and fabric screens, with most projects completable in a weekend.
- Living walls with climbing vines or vertical gardens improve air quality and provide privacy within one to three seasons, while potted plants offer temporary flexibility.
- Slatted wood panels are a classic DIY choice that requires sealing within six months to prevent weathering, with 1–2 inch spacing balancing privacy and airflow.
- Shade cloth (30–70% density) and outdoor fabric panels provide affordable, removable privacy solutions ideal for renters, with 50% density offering the best privacy-to-light balance.
- Metal and aluminum screening delivers durability and modern aesthetics with zero maintenance, lasting 20+ years at higher upfront cost ($150–$300 per panel).
- Combination designs mixing materials—such as wood frames with climbing vines and rolling fabric panels—create maximum visual interest and flexible light control for personalized pergola privacy solutions.
Living Walls And Green Privacy Screens
A living wall transforms your pergola into a lush, natural barrier while softening noise and improving air quality. Climbing vines like clematis, jasmine, or climbing hydrangea attach directly to the pergola frame with minimal support, maturing in one to three seasons. Fast-growing ivy works too, though it requires more frequent pruning to prevent overtaking gutters or siding.
For a more structured approach, vertical gardens mounted on frames or trellises create instant privacy while growing vegetables, herbs, or ornamental plants. These require regular watering, especially in hot climates, drip irrigation saves time and ensures consistent moisture. Potted plant screens are the easiest temporary option: arrange tall planters (ornamental grasses, bamboo in containers, or flowering shrubs) along the pergola edges. Potted plants offer flexibility if you move or redesign later.
Living walls need sunlight and airflow to thrive. Six hours of direct sun supports most vines: less light favors shade-tolerant ferns and foliage. Check local plant hardiness zones and water needs before committing. Gardenista offers outdoor design inspiration if you’re planning a garden-forward privacy setup.
Slatted Wood Panels For Natural Shade And Privacy
Horizontal or vertical slatted wood panels are a classic DIY choice. Cedar, redwood, or pressure-treated lumber offer durability and a clean look. Vertical slats (typically 1×6 or 1×8 nominal boards spaced 1–2 inches apart) provide privacy while allowing air circulation. Horizontal slats feel more modern and are easier to install on existing pergola posts.
Installation basics: Attach 2×4 or 2×6 posts vertically to the pergola frame or directly into ground footings if adding a standalone screen. Connect cross-beams between posts, then screw or nail individual slats, evenly spaced gaps look intentional. Measure twice: pre-drill screw holes to prevent splitting. A power driver speeds up fastening for large panels.
Seal or stain wood within six months to prevent weathering and rot, especially in humid regions. Two coats of exterior-grade stain or polyurethane extends the life to 10+ years. Paint or leave wood natural depending on your pergola’s existing finish. Space slats closer together (1/2-inch gaps) for maximum privacy: wider spacing (2+ inches) maintains airflow and a lighter aesthetic. Ana White’s DIY plans include outdoor screening projects perfect for beginners wanting detailed instructions.
Fabric And Shade Cloth Solutions
Outdoor fabric panels and shade cloth offer flexible, affordable privacy without permanent installation. These are ideal if you rent, travel seasonally, or want to experiment before committing.
Shade cloth comes in various densities, 30%, 50%, and 70% blocks sunlight and view respectively. A 50% cloth balances privacy with light transmission for most patios. Drape it over a wire or rope system strung between pergola beams, then secure corners with carabiners or tie-downs. No tools required beyond a drill for mounting hardware.
Outdoor fabric panels in canvas, sunbrella, or performance textiles offer a polished look. Many homeowners hang panels from a sturdy rod mounted horizontally across the pergola top or sides. Include a hinge or clip system so panels roll up on clear days. Fabric and cloth require occasional cleaning to prevent mildew, rinse with water and mild soap annually in humid climates.
Weight matters: wind can whip unsecured fabric. Ensure mounting hardware is rated for the fabric’s weight plus wind loads (typically 30–50 lbs per panel in moderate climates). Check local building codes if adding permanent overhead structures: freestanding fabric screens usually don’t require permits.
Metal Lattice And Modern Screening Options
Metal lattice panels and aluminum screens deliver durability with a contemporary feel. Aluminum lattice resists rust and requires zero maintenance, unlike wood that needs sealing. Modern perforated metal panels, mesh screens, or geometric laser-cut designs create striking visual interest while blocking sight lines.
Installation is straightforward: mount pre-fabricated panels to the pergola frame using stainless steel bolts and brackets. Aluminum is lightweight, so fastening is simpler than wood, and a cordless drill with a metal bit handles most work. Measure post spacing carefully, most panels come in standard 4×8 or 4×6 sizes, so custom fitting may require cutting or shimming.
Welded wire or cable systems offer an industrial-chic look. String stainless steel cable horizontally between posts, then weave thin wooden slats or climbing plants through. This hybrid approach combines durability with natural softness.
Aluminum panels run higher upfront ($150–$300 per 4×8 panel) but last 20+ years with zero upkeep. Wood costs $60–$150 per panel but requires periodic maintenance. Metal also reflects heat differently than wood, so consider sun exposure and comfort during peak summer. Fix This Build That has tool reviews and project setups worth consulting if you’re new to outdoor construction.
Combination Designs: Mixing Materials For Maximum Impact
The most visually interesting privacy walls blend materials. A wood frame with horizontal slats, climbing vines woven through, and a fabric panel that rolls down on windy days combines privacy, greenery, and flexible light control.
Another approach: half-height slatted wood topped with metal lattice, leaving open space above. This creates privacy at eye level while maintaining an airy feel and allowing tall views. It’s also cheaper than a full-height screen.
Combining materials requires careful planning: ensure all fasteners are compatible (stainless steel won’t corrode against wood or metal), and that load paths are clear. A 2×4 frame can typically support 100–150 lbs of screening material safely: heavier setups (stone veneer, dense bamboo) may need reinforcement or post holes sunk 24–36 inches deep for stability.
Mix finishes thoughtfully. Natural cedar with black metal accents feels modern: stained wood with climbing ivy is timeless. Paint all fasteners and frame components the same color for a polished look. Test stain colors on scrap wood first, shade changes with wood grain and weathering.
Installation Tips And Budget Considerations
Before you start, measure your pergola frame and check local building codes. Most privacy screens don’t require permits if they’re non-structural and attached to an existing pergola, but height limits (often 6–8 feet in residential zones) and setback distances from property lines vary. Check with your local building department if you’re uncertain.
Prep work matters. Clean the pergola frame of dirt and debris. Use a wire brush and mild cleaner: let it dry completely. Loose paint or sealant should be scraped off so fasteners bite solid wood. Measure multiple times, a 1/8-inch error compounds across a 10-foot span.
Fastener choice: Use exterior-grade stainless steel screws or galvanized bolts: standard steel rusts quickly outdoors. Pre-drill pilot holes in wood to prevent splitting, especially near edges. A cordless drill/driver with a bit set speeds installation tenfold.
Safety: Wear eye protection and work gloves when cutting or fastening. If working at height, use a sturdy ladder rated for your weight plus tool weight, and have someone steady it. Respect weight limits, panels and vines add surprising load.
Budget range: Simple fabric clips or potted plants start under $100. Slatted wood panels (materials and fasteners) run $300–$800 depending on height and span. Metal panels cost $600–$1,500 for a modest pergola. Professional installation adds 40–60% to material costs if you’re uncomfortable working overhead. Start small, a 4×6-foot test section lets you refine your approach before committing to full coverage.
Conclusion
Privacy walls transform a pergola from a simple shade structure into a genuine outdoor room. Whether you choose living vines for natural softness, durable wood slats, flexible fabric, or sleek metal screening, the best option fits your climate, budget, and maintenance appetite. Start with your most pressing need, blocking a neighbor’s gaze, reducing wind, or adding greenery, then build from there. Most projects finish in a weekend and reward patience with years of enjoyment. Your pergola retreat awaits.