Adding a deck to a mobile home opens up outdoor living in a way few other projects can match. A well-planned mobile home deck gives you a defined outdoor space, boosts curb appeal, and extends your living area, all without a major renovation budget. Whether you’re looking for a simple ground-level platform or a multi-level entertainment hub, the right deck design fits both your lifestyle and your wallet. This guide walks you through popular mobile home deck ideas, material choices, and DIY installation basics so you can tackle your project with confidence.
Table of Contents
ToggleKey Takeaways
- A mobile home deck transforms your outdoor living space for $800–$2,500, offering usable square footage without permits, permanent structural changes, or major renovation costs.
- Raised platform decks (12–24 inches high) work best for mobile homes because they clear the undercarriage, improve drainage, and maintain consistent step height with your home’s entrance.
- Pressure-treated lumber costs $0.60–$1.20 per linear foot and lasts 15+ years with proper maintenance, while composite materials ($2–$5 per linear foot) require zero staining and minimal upkeep.
- Always obtain a building permit before construction—it costs $50–$200 but ensures an inspection that catches critical issues like undersized footings and inadequate frost-line depth that could compromise your deck’s durability.
- Use galvanized or stainless steel fasteners (never rust-prone nails), leave 1/8-inch gaps between deck boards for drainage, and space deck screws 12 inches apart along each joist for maximum longevity.
- Most DIYers can build an 8-by-12 foot mobile home deck in a weekend with basic tools, a helper, and adherence to local building codes.
Why Add a Deck to Your Mobile Home
A deck transforms your mobile home from a self-contained box into a gateway to the outdoors. You gain usable square footage without interior construction, which means no permits, no permanent structural changes, and no headaches pulling electrical or plumbing. A simple 8-by-10 foot deck can cost anywhere from $800 to $2,500 depending on materials, far less than adding a room.
Beyond economics, a deck improves your quality of life. Morning coffee on the porch, kids playing within sight-lines, grilling on a dedicated platform, these everyday moments make a home feel less transient. For mobile home owners, that sense of ownership and permanence matters. A deck also protects the area directly under and around your home’s steps, preventing soil erosion and creating a cleaner transition between your home and the yard.
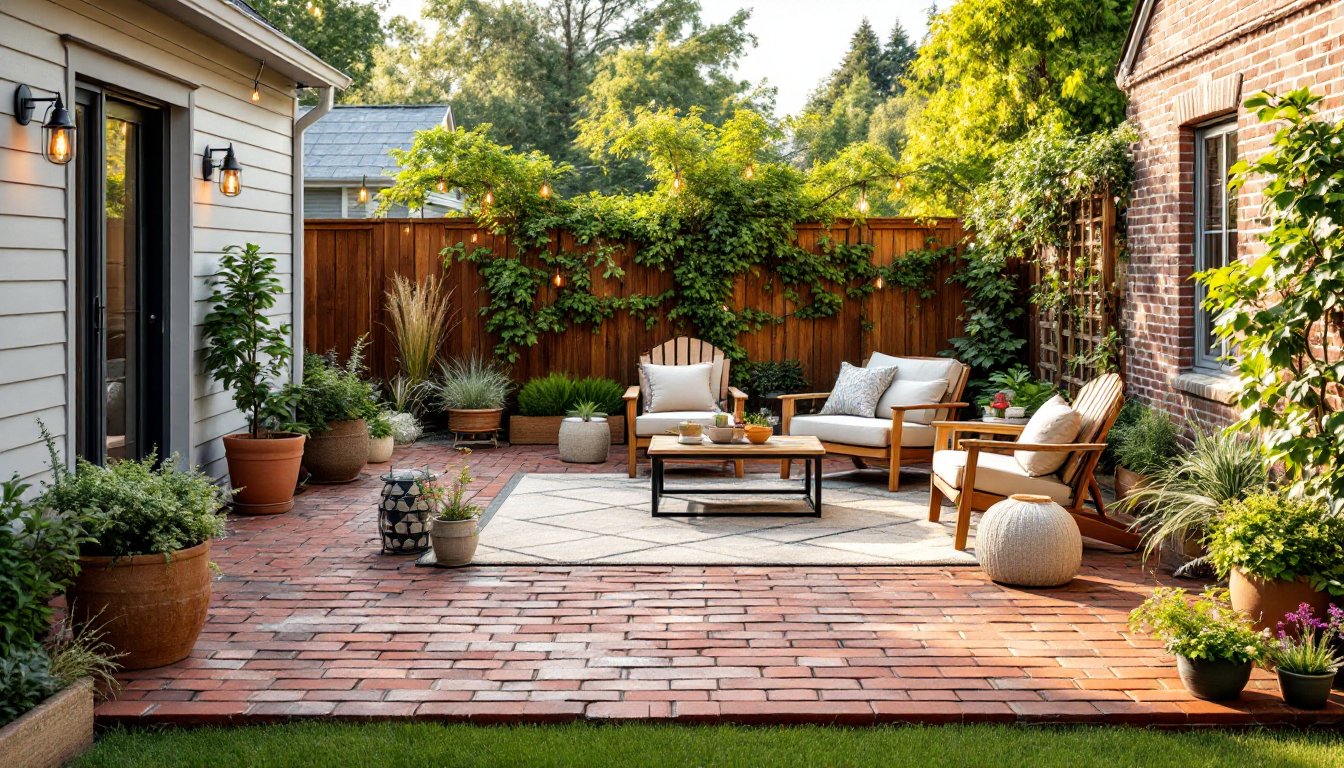
Popular Mobile Home Deck Designs
Raised Platform Decks
Raised decks sit on concrete piers, posts, or adjustable deck blocks and typically stand 12 to 24 inches above ground. This design works well for mobile homes because it clears the undercarriage, improves drainage, and makes step height consistent with your home’s entrance.
The beauty of a raised platform deck is flexibility. You can build it single-level or add tiered sections for visual interest. Many DIYers start with a simple 8-by-12 foot rectangle, enough for a table and four chairs, and expand later. Raised decks also leave room underneath for storage, shade, or even a small seating nook. Building codes typically require posts spaced no more than 6 feet apart, and your local inspector will check that footings extend below the frost line (varies by region, but often 36 to 48 inches deep). If frost heave is an issue in your area, this step is non-negotiable: skipping it means your deck will shift and crack.
Ground-Level and Floating Decks
Ground-level and floating decks sit nearly flush with the soil, creating a seamless transition from your home to the yard. These designs work beautifully in flat terrain and feel less imposing than raised decks.
Floating decks rest on concrete pads or adjustable piers but don’t require deep footings or a massive support structure. They’re genuinely easier to build and cost less to construct. The downside: they sit closer to moisture, so wood rot and pest access become bigger concerns. You’ll need quality outdoor decking materials and annual inspections. Also, most codes require a 6-inch minimum clearance between the deck board and soil to prevent moisture wicking and insect damage. If your site has poor drainage, a raised deck is the smarter choice.
Material Choices for Durability and Budget
Pressure-treated lumber remains the budget workhorse. Southern Yellow Pine or Hemlock, both kiln-dried after treatment (KDAT), costs roughly $0.60 to $1.20 per linear foot for a 2-by-8. It’s strong, readily available, and if maintained (sealed every 2–3 years), lasts 15+ years. Pressure-treated wood resists rot and insects, though the chemical smell fades within weeks. Always let it acclimate to your site for a few days before cutting to minimize cupping and warping.
Composite materials like Trex, TimberTech, and DuraLife run $2 to $5 per linear foot but need zero staining and minimal upkeep. They don’t splinter, don’t rot, and hold their color far longer than wood. For a mobile home deck, composites are a smart mid-range investment if your budget allows.
For purely cosmetic budgets, standard pressure-treated construction lumber works fine. Just commit to sealing it within a year and re-sealing every 2–3 years. Skip the sealant, and you’ll see graying and soft spots within 18 months. Reclaimed or recycled lumber can look rustic and costs less, but inspect it carefully, hidden nails, rot, or insect damage can ruin your deck or your tools. Country Living’s approach to rustic outdoor spaces shows how material honesty and durability go hand-in-hand.
DIY Mobile Home Deck Installation Basics
Before you dig a single post hole, check with your local building department. Decks attached to homes almost always need a permit. Even ground-level decks may require one, depending on size and local code. A permit costs $50 to $200 but gets you an inspection that catches problems you’d miss, undersize footings, inadequate spacing, or frost line failures that doom your deck in year two.
Materials you’ll need:
- Pressure-treated posts (4-by-4 for primary supports)
- Deck boards (2-by-6 or 2-by-8, depending on joist spacing)
- Galvanized or stainless steel fasteners (nails rust and stain: use deck screws or galvanized fasteners)
- Concrete for post footings (if not using adjustable piers)
- Gravel for drainage around post footings
Tools:
- Circular saw or miter saw (cleaner angle cuts)
- Drill-driver combo
- 4-foot level
- Tape measure
- Adjustable wrench or socket set
- Safety glasses, work gloves, and dust mask
Basic steps:
-
Lay out and mark post locations using a chalk line and a 3-4-5 triangle to ensure square corners. Spacing depends on your joist size: 2-by-8 joists typically span up to 12 feet with posts 6 feet apart.
-
Dig or set post footings to local frost-line depth. Use concrete piers or mixed concrete to set posts in place. Allow concrete to cure 48 hours before building on it.
-
Install rim joists and inner joists using galvanized lag bolts or bolts rated for exterior use. Joist hangers make this easier and are code-approved in most jurisdictions.
-
Install deck boards perpendicular to joists. Leave a 1/8-inch gap for drainage and wood movement. Use deck screws rated for outdoor use (stainless or coated) and space fasteners 12 inches apart along each joist. Garden design resources like Gardenista often feature decks integrated with landscaping that improves final aesthetics, but structure comes first.
-
Add railings if required. Most codes mandate a railing if your deck sits 30 inches or higher above ground. Posts must be spaced no more than 4 inches apart (or 6 inches for balusters) to prevent a child’s head from fitting through. Test compliance with a 4-inch sphere, if it fits, your spacing is too wide.
Safety reminders: Wear eye protection when cutting and safety glasses when driving fasteners. Use a dust mask when cutting pressure-treated wood (the chemical dust is a respiratory irritant). Keep your work area organized, tripping hazards and tool injuries happen fast. If you’re building anything higher than 3 feet or wider than 12 feet, consider hiring a second pair of hands or a contractor: the risk-to-reward ratio tilts once complexity climbs.
Conclusion
A mobile home deck doesn’t have to be complicated or expensive. Start with a simple raised platform, use pressure-treated lumber or budget-friendly composites, and follow local codes. Most DIYers can build an 8-by-12 foot deck in a weekend with basic tools and a helper. The payoff, a defined outdoor space, better curb appeal, and room to breathe, makes the effort worth every nail.