A kitchen island is one of the highest-impact renovations a homeowner can tackle, it instantly adds counter space, storage, and a natural gathering point. Whether you’re working with 100 square feet or 300, the right island design transforms how your kitchen functions and looks. This guide covers practical island layouts, functional features that actually save time, and design finishes that work with your home’s style. You’ll learn what size works for your space, which storage solutions matter most, and how to install an island without major headaches.
Table of Contents
ToggleKey Takeaways
- A kitchen island requires at least 3 feet of clearance on all sides for safe passage, and a peninsula is a better choice for smaller kitchens with limited space.
- The ideal kitchen island size depends on your layout: 4-foot islands suit small spaces, while 6- to 8-foot islands accommodate both seating and storage for larger kitchens.
- Investing in functional features like soft-close drawer hardware, deep storage, and proper electrical or plumbing runs prevents costly repairs and maximizes your kitchen island’s daily usability.
- Material selection shapes both durability and maintenance: quartz and sealed hardwood offer the best balance of style and low-maintenance practicality for kitchen island countertops.
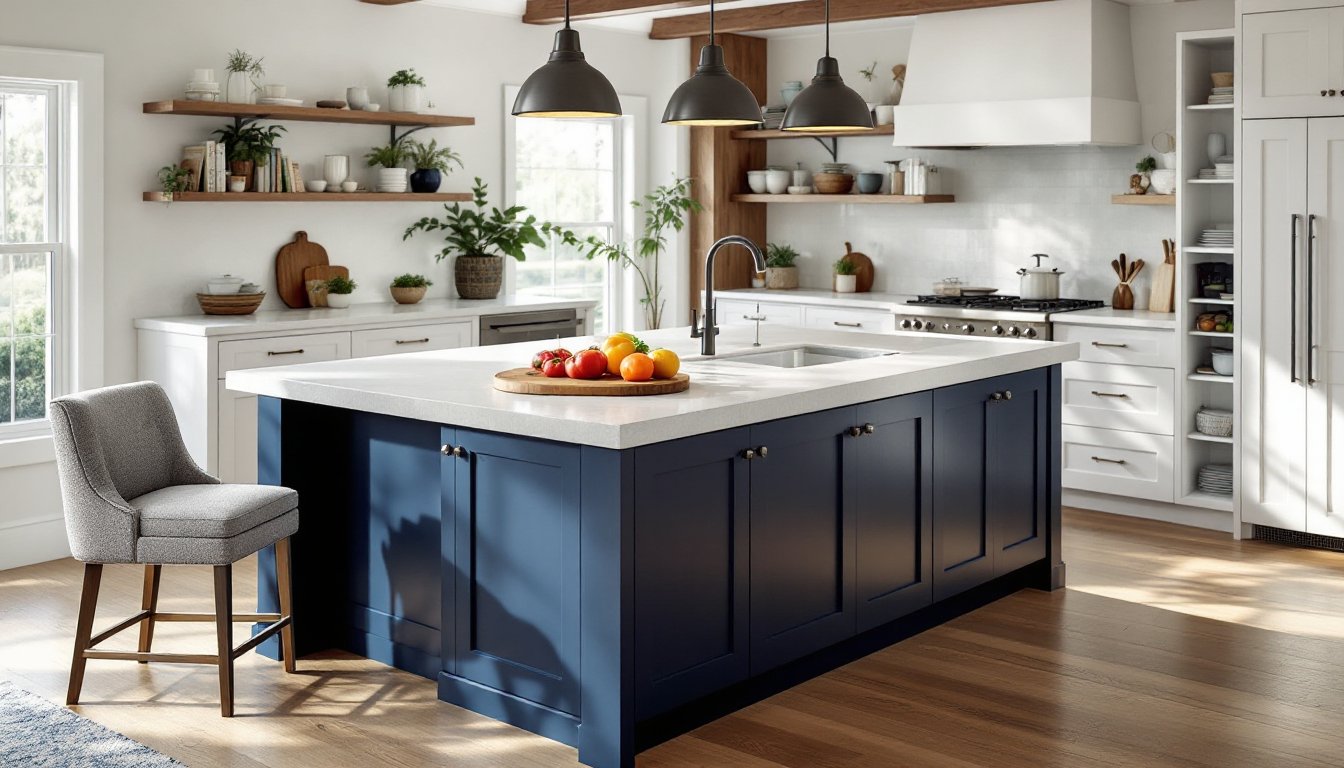
- Island lighting with 3–4 pendant lights spaced 18–24 inches apart and positioned 12–18 inches below the ceiling creates both task lighting and visual focal point impact.
- Budget for utilities carefully—adding a sink costs $2,000–$5,000, while a cooktop adds $1,500–$4,000, and full custom kitchen islands can take 10–16 weeks to complete.
Understanding Kitchen Island Basics and Layout Options
Before you buy or build, understand what an island can and can’t do in your specific kitchen. An island works best when there’s at least 3 feet of clearance on all sides, this is the minimum safe walking distance for two people to pass without bumping. If your kitchen is smaller, a peninsula (attached to the wall) often makes more sense than a freestanding island.
The most common island layouts depend on your kitchen’s shape. In galley kitchens (parallel walls), an island centers the space and breaks up the tunnel effect. In L-shaped kitchens, the island fills the inside corner and creates an efficient work triangle with your stove, sink, and refrigerator. In open-concept homes, the island becomes a semi-barrier that defines the kitchen zone while staying visually open.
How to Choose the Right Island Size and Shape for Your Kitchen
Measure twice, commit once. Start with your kitchen’s total square footage and existing traffic patterns. A standard 24-inch-deep island fits most layouts: if you add seating on both sides, bump that to 30 inches. Length depends on function: a 4-foot island works for small kitchens and primarily provides counter space, while a 6- or 8-foot island adds seating and storage.
Consider the shape. Rectangular islands are workhorses, they offer maximum counter area and align with galley or linear kitchens. L-shaped or angled islands create visual interest and work well in open concepts where you want to define zones without blocking sightlines. Rounded corners on islands prevent knee bruises and make tight spaces feel less cramped.
Also account for electrical and plumbing runs. If you want a sink in the island, plan for a rough-in under the subfloor before framing, this isn’t a detail you want to patch up later. Similarly, a cooktop or grill requires ventilation (usually a downdraft system), which adds cost but keeps cooking fumes out of your main living area.
Functional Island Designs for Better Workflow
The best islands earn their space. Think about what you actually do in your kitchen: prep work, cooking, eating, or socializing. A prep-focused island might have a large butcher-block top, multiple drawers for knives and utensils, and open shelving for cookbooks. A social island prioritizes comfortable seating and a built-in beverage cooler.
Storage is a huge factor. Most kitchen renovations hit budget ceilings partly because storage is expensive, custom cabinetry runs $100–$250 per linear foot depending on finishes. An island with deep, full-height cabinets on the sides facing the kitchen maximizes storage without eating up wall space. Open shelving on the side facing the living room keeps the space feeling light while showing off your dishware or cookbooks.
Storage and Seating Solutions That Maximize Space
Drawers beat cabinet doors for daily use, you reach in and grab what you need without opening and closing. Incorporate drawer organizers, soft-close hardware (Blum, Grass, or KV are reliable brands), and deep drawers (18–24 inches deep) for mixing bowls, sheet pans, and small appliances. A single row of narrow drawers at the top handles utensils and gadgets: deeper drawers below store bulk items.
For seating, three to four bar stools work for an 8-foot island: two stools for a 4-foot island. Ensure 30–36 inches of clear knee space under the overhang, this is standard and lets people sit comfortably without their knees hitting the base. A 12- to 15-inch overhang is typical: go wider only if you have the structural support and the island doesn’t block traffic flow.
Combo islands add flexibility: a cooktop paired with a sink, or a seating area with storage cabinets. But, each utility adds cost and complexity. A sink requires plumbing: a cooktop needs ventilation and electrical work. If you’re hiring contractors, budget an extra $3,000–$8,000 for these utilities depending on your region and current infrastructure. DIYers with intermediate skills can handle basic electrical and gas hookups if you follow code, but plumbing often demands a licensed professional.
Stylish Island Materials and Finishes
Materials set the tone. Butcher block (solid hardwood, 1.5 inches thick) feels warm and is forgiving for food prep, though it requires annual mineral oil treatment and stains easily, reseal annually and wipe spills immediately. Quartz or engineered stone is durable, low-maintenance, and available in hundreds of colors: it costs more upfront but lasts decades without refinishing. Marble and granite look luxe but stain and etch, so they suit islands used more for display than heavy prep work.
Stainless steel tops are commercial-style and hide fingerprints well: they’re loud when you set things down and require buffing to avoid streaks. Tile (ceramic or porcelain) is budget-friendly and easy to replace individual tiles, but grout stains over time. For longevity and low fuss, quartz or a sealed hardwood top like cherry or oak balance style and practicality.
Base cabinet materials matter too. Solid wood cabinetry (maple, oak, alder) can be stained or painted and is repairable if damaged. Plywood boxes with veneer are lighter and cheaper, but veneer can delaminate if exposed to water. If your kitchen gets humid (near a sink or dishwasher vent), solid wood or moisture-resistant plywood with a good finish are safer bets.
Creating Visual Impact With Color, Texture, and Lighting
Color grounds an island in your overall kitchen design. A contrasting island, say, deep navy or charcoal cabinetry with lighter counters, anchors the space and draws the eye. A matching island (cabinets the same color as your perimeter cabinetry) feels cohesive and less formal. If you’re uncertain, neutral grays and whites age better than bold trend colors, though soft greens and blacks are gaining traction in 2026.
Texture adds depth without clutter. Fluted panel doors, ribbed cabinet sides, or a textured finish on the cabinet base create visual interest from a distance. Pair a smooth quartz countertop with a subtly textured base for balance. Avoid competing patterns, one standout element (like a veined marble top or paneled doors) is enough.
Lighting transforms an island into a focal point. Three to four pendant lights spaced 18–24 inches apart above the counter create task lighting for prep work and ambient light for evenings. Warm white bulbs (2700K–3000K color temperature) feel inviting: brighter 4000K bulbs suit modern spaces and task-heavy kitchens. Pendant cords or stems should hang 12–18 inches below cabinet soffits or the ceiling, and the fixtures’ width should be about 1/3 the island’s width for proper proportion. Resources like The Kitchn and Homify’s kitchen island designs showcase lighting approaches that balance function and style.
Practical Installation and Design Considerations
Before framing or ordering custom cabinetry, confirm electrical and plumbing routes. Most kitchens have outlets along walls: if your island needs outlets (for a mixer, phone charger, or beverage cooler), you’ll need to run wiring under the subfloor in a conduit or racetrack to avoid hazards. This requires roughing in before the floor is finished, a reason to plan early.
Floor strength matters. A fully loaded island (cabinets plus countertop plus appliances) can weigh 500–1,500 pounds. Joists spaced 16 inches on center typically handle this, but if you’re in an older home or have concerns, consult a structural engineer ($200–$500 for a quick assessment). A sagging floor under an island is a repair nightmare.
Building codes vary by locale, but most jurisdictions require that an island’s footprint be clearly marked and that plumbing vents (if installed) meet minimum spacing rules. If you’re adding a gas cooktop to the island, ventilation must comply with local codes, usually a 6-inch to 8-inch duct venting outside through a roof or wall. Downdraft systems pull air down and out: overhead hoods are more common and effective, though they eat into your sightlines.
Most DIYers can handle base cabinet assembly and countertop installation if they’re handy. Stock island kits (IKEA, Lowe’s, Home Depot) cost $800–$3,000 and are fast: semi-custom options ($3,000–$8,000) let you adjust depth, height, and storage. Full custom work ($8,000+) is worth it if your kitchen has odd dimensions or you want integrated appliances.
Budget for utilities carefully. A sink adds $2,000–$5,000 (plumbing labor): a cooktop or grill adds $1,500–$4,000 (ventilation and electrical). A simple waterfall countertop edge (quartz or marble dropping down one side) costs $500–$1,500 depending on material and complexity. Paint or stain finishing for cabinets runs $800–$2,500 if you hire it done: DIY staining takes a weekend but demands prep work, sand, prime, two coats of finish, and 48 hours to cure.
Installation timelines: a stock island from a big-box store can be assembled and installed in a day or two. Semi-custom cabinetry takes 4–8 weeks for build and delivery, plus 1–2 days for installation and countertop templating. Full custom can stretch 10–16 weeks. Plan for dust, noise, and reduced kitchen function during installation, two weeks without a fully functional kitchen is common for countertop work.
Finally, Remodelista’s kitchen island collection for design-forward inspiration that scales from small apartments to sprawling homes. Their examples often highlight how lighting, proportion, and material choices elevate a functional piece into a designed element.